Stylish Living Room Entryway Shoe Rack Ideas
Shoe rack in living room entryway ideas are a game-changer for anyone tired of that constant, cluttery pile greeting them at the door. You know the one – shoes scattered, tripping hazards, and that nagging feeling of disarray the moment you step inside. Well, imagine this: a beautifully organized entryway, where every pair has its designated spot, instantly transforming your living room into a welcoming oasis. No more frantic searching for matching socks or stubbing your toe on forgotten boots! These stunning solutions, often achievable in a weekend and with a budget ranging from budget-friendly DIYs to stylish mid-range purchases, will redefine your entryway.
In this article, I’ll share over 17 brilliant concepts to help you discover the perfect shoe storage that not only conquers clutter but also adds serious style. Get ready to learn about space-saving marvels, multi-functional furniture, and clever design tricks that will have your guests saying “wow”!

17+ Shoe Rack in Living Room Entryway Ideas That Wow
The entryway to your home is your first impression, and for many of us, it’s also a daily battleground against shoe chaos. Piles of footwear can quickly transform a welcoming space into a cluttered mess. But fear not! Incorporating a stylish and functional shoe rack in your living room entryway is not just achievable, it can be a statement piece that elevates your entire home’s aesthetic. I’ve explored countless ideas, and today, I’m sharing over 17 of my favorite ways to conquer shoe clutter and create an entryway that truly wows.
What You’ll Need and Roughly What It Costs
The beauty of entryway shoe storage is its versatility. You can go from a simple DIY project to a high-end designer piece. Here’s a general breakdown of what you might need and the associated costs, keeping in mind these are rough estimates and can vary wildly based on your choices:
For most DIY or budget-friendly options, you’ll likely be looking at:
* **Materials:** Wood planks (pine is affordable, around $10-$30 per 8-foot board), screws or nails (around $5-$10 for a box), wood glue (around $5-$10), sandpaper (around $5-$10 for a pack), and a finish like paint or stain (around $15-$30 per can).
* **Tools:** A measuring tape (essential, around $10-$20), a saw (hand saw around $20-$40, power saw around $70-$200), a drill (cordless drill around $50-$150), and a screwdriver.
* **Hardware:** Hinges, brackets, or drawer slides if you’re building something more complex (costs vary, but expect to spend $10-$50).
For pre-made solutions, you have even more options:
* **Basic Shelf Units:** These can range from simple metal or bamboo tiered shelves ($30-$80) to more substantial wooden units ($70-$200).
* **Storage Benches with Shoe Compartments:** These are fantastic for multi-functional spaces and can cost anywhere from $100-$400.
* **Wall-Mounted Solutions:** Sleek and space-saving, these can be simple shelves ($40-$150) or specialized shoe cabinets ($150-$500+).
* **Decorative Baskets or Bins:** A quick and easy solution, these can cost $20-$100 each, depending on material and size.
Measuring and Planning Before You Start
Before you even think about screws or stain, take some time to measure and plan. This is crucial for ensuring your shoe rack fits perfectly and functions as intended.
1. **Assess Your Space:**
* Measure the width, depth, and height of the area where you envision your shoe rack. I’m talking about precise measurements, down to the inch. For example, if you have a wall space that’s 48 inches wide, 15 inches deep, and 36 inches high, that’s your starting point.
* Consider the traffic flow. You don’t want the shoe rack to obstruct the doorway or make it difficult to move around. Leave at least 30-36 inches of clear passage if possible.
* Look at the surrounding furniture. Will the shoe rack complement or clash with your existing decor?
2. **Inventory Your Shoes:**
* This is often the most surprising part! How many pairs of shoes do you *actually* need to store in your entryway? Be realistic. Are we talking everyday sneakers and boots, or do you have formal shoes that rarely see the light of day?
* Measure the height of your tallest boots. This will determine the minimum clearance you’ll need on certain shelves. A standard boot might be 16-18 inches tall.
* Consider the size of your shoe collection. If you have 20 pairs, you’ll need more storage than if you have 8 pairs.
3. **Determine Your Needs:**
* Do you need to store just shoes, or would you also like space for keys, mail, or decor items?
* What’s your style? Modern, rustic, minimalist? This will guide your material and design choices.
### A Clear Numbered Walkthrough of the Process
Let’s imagine we’re building a simple, tiered wooden shoe rack. This is a popular and achievable DIY project.
1. **Gather Your Materials and Tools:** Based on your measurements, purchase your wood (e.g., two 8-foot pine boards, 1 inch thick and 8 inches wide), screws (e.g., 1.5-inch wood screws), wood glue, sandpaper, and your chosen finish. Ensure you have your measuring tape, saw, drill, and screwdriver.
2. **Cut Your Wood:** For a simple two-tier rack designed to fit a 36-inch wide space with some breathing room, you might cut:
* Two side pieces: 30 inches long (these will be the legs)
* Four shelf pieces: 33 inches long (these will be the shelves)
3. **Sand All Pieces:** Smooth out any rough edges and surfaces on all your cut wood pieces. This is important for both aesthetics and safety.
4. **Assemble the First Shelf:** Take one side piece (30 inches) and one shelf piece (33 inches). Apply wood glue to the end of the shelf piece. Position the shelf piece flush with the top of the side piece, creating an L-shape. Pre-drill pilot holes through the side piece into the shelf and secure with screws. Repeat this for the other side piece, attaching it to the other end of the same shelf piece. You now have the top shelf attached to both legs.
5. **Attach the Second Shelf:** Decide on the height for your second shelf. For a good balance, I usually leave about 12-14 inches of space between shelves. Measure down from the top shelf on the inside of both side pieces and mark your desired height. Apply wood glue to the ends of another shelf piece, align it with your marks, pre-drill, and secure with screws from the outside of the side pieces.
6. **Attach the Remaining Shelves:** Repeat step 5 for any additional shelves you’re adding. I typically aim for 2-3 shelves for a good balance of storage and visual appeal.
7. **Add Support (Optional but Recommended):** For added stability, especially with heavier shoes, you can add back braces. Cut two pieces of wood (e.g., 33 inches) and attach them horizontally to the back of the side pieces, just below each shelf.
8. **Finishing Touches:** Once the glue is dry and the structure is solid, give everything a final light sanding. Apply your chosen paint, stain, or sealant according to the product’s instructions. Allow ample drying time.
### Adapting for a Small Space or a Rental
Don’t have a lot of floor space or can’t drill into walls? No problem!
* **Vertical Solutions:** Look for tall, narrow shoe racks that utilize vertical space. These can be as simple as a multi-tiered rack with a small footprint, or even a tension rod shelf unit that can be placed in a corner. Some tension rod shelves can be installed without drilling, offering adjustable shelves.
* **Over-the-Door Shoe Organizers:** These are a lifesaver for small apartments. They typically have multiple pockets for shoes and hang over the back of your door. Look for ones made from sturdy fabric or clear plastic. Some can even hold up to 20 pairs of shoes!
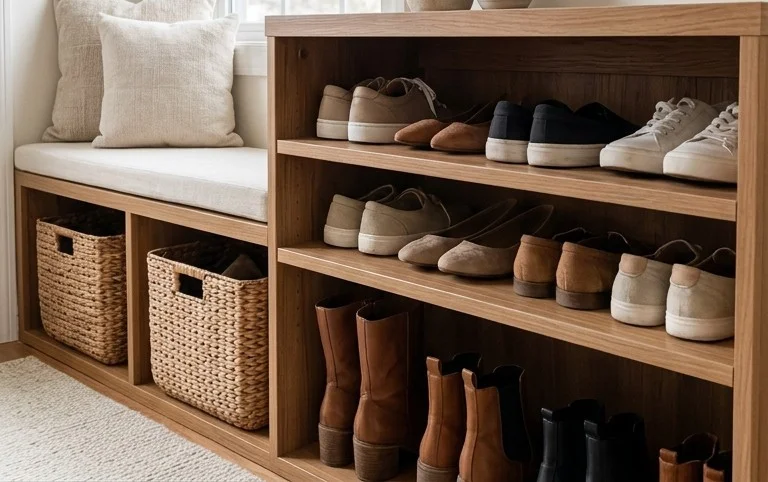
* **Decorative Baskets and Bins:** A few stylish woven baskets or fabric bins can work wonders. Assign a bin for sneakers, another for sandals, and so on. These can be tucked neatly under a console table or beside a bench.
* **Under-Bench Storage:** If you have an entryway bench, look for one with built-in shoe storage or use the space underneath for attractive bins or even stackable shoe boxes.
* **Repurposed Furniture:** An old bookshelf, a low coffee table, or even a sturdy ottoman can be creatively repurposed into shoe storage. You might need to add some dividers or a few extra shelves.
* **Freestanding Units:** Many pre-made shoe racks are designed to be freestanding, requiring no assembly or drilling. Look for units with a small footprint.
### Styling Notes: Color, Texture, and Placement
Once your shoe rack is in place, it’s time to make it look as good as it functions.
* **Color Palette:**
* **Wood Tones:** Natural wood, stained wood, or painted wood in neutral shades like white, gray, or black are timeless and versatile.
* **Metal Accents:** For a modern or industrial look, consider metal shoe racks in black, brushed nickel, or copper.
* **Pop of Color:** If your entryway is otherwise neutral, a brightly colored shoe rack or storage bins can add a playful touch.
* **Texture:**
* **Wood Grain:** The natural texture of wood adds warmth and character.
* **Woven Baskets:** Natural fibers like rattan, wicker, or jute bring organic texture and a relaxed feel.
* **Fabric Bins:** Soft fabrics can add a cozy element.
* **Metal Finishes:** Smooth, polished metal offers a sleek, contemporary texture.
* **What to Put Where:**
* **Top Shelf:** This is prime real estate for decorative items. A small potted plant, a decorative vase with some greenery, a framed photo, or a stylish tray for keys and mail work beautifully. This is also a good spot for less frequently worn shoes, like special occasion heels.
* **Middle Shelves:** These are your workhorses for everyday shoes. Place them neatly, heel to toe, to maximize space. Try to group similar types of shoes together – sneakers on one shelf, sandals on another. For taller boots, you might need to lay them on their side or consider a separate boot rack or storage solution if your rack doesn’t have enough vertical clearance.
* **Bottom Shelf/Floor:** This is ideal for heavier, bulkier items like mud boots or large sports shoes. If your rack has a bottom, it can also house extra pairs of shoes or larger storage bins.
### How to Keep It Tidy After Week One
The initial excitement of a new, organized entryway can wane. Here’s how to maintain the magic:
1. **The “One In, One Out” Rule:** When a new pair of shoes comes into the house, an old one needs to go. This prevents your collection from spiraling out of control.
2. **The “Dirty Shoes Stay Out” Policy:** Designate a spot *outside* your immediate entryway for muddy or wet shoes. A small outdoor mat or a designated area on your porch can work wonders.
3. **Weekly Tidy-Up (5 Minutes Max):** Dedicate just five minutes each week (Sunday morning is my go-to) to a quick shoe shuffle. Straighten rows, put stray shoes back in their designated spots, and wipe down the rack if needed.
4. **Regular Purge:** Set a reminder every few months to do a more thorough shoe declutter. Be honest about what you actually wear and what’s just taking up space. Donate or sell what you no longer need.
5. **Educate the Household:** Make sure everyone in your home understands the system and the importance of putting shoes away properly. A little gentle reminder can go a long way.
### Mistakes That Make This Fail
Even the best intentions can go awry. Here are common pitfalls to avoid:
* **Over-Cramming:** Trying to shove too many shoes onto a rack designed for fewer will inevitably lead to an untidy look and potential damage to your footwear. Respect the capacity of your storage.
* **Ignoring Shoe Types:** A low shelf might be great for flats, but it’s a disaster for tall boots. Plan your shelves with your actual shoe collection in mind.
* **Not Considering Traffic Flow:** A beautiful shoe rack that blocks your doorway is a failure. Always prioritize functionality and ease of movement.
* **Neglecting the “Outsider” Shoes:** If you have a habit of leaving muddy or wet shoes in the entryway, no amount of organizing will help. Address the source of the clutter.
* **Letting Decor Overpower Function:** While styling is important, don’t let decorative items take up so much space that they hinder shoe storage. Find a balance.
* **Giving Up After Week One:** Consistency is key. A quick weekly tidy-up is far more effective than a massive overhaul every few months.
Creating a wow-worthy shoe rack in your living room entryway is an achievable goal. With a little planning, the right materials, and a commitment to a tidy routine, you can transform a chaotic corner into a stylish and organized welcome. Happy organizing!
Conclusion
Incorporating a stylish and functional shoe rack in your living room entryway isn’t just about aesthetics; it’s about transforming your daily routine. Imagine stepping into a calm, clutter-free space every time you come home, no more tripping over stray shoes! This small change makes a surprisingly big difference in creating a welcoming atmosphere.
Ready to start? Your first step today could be as simple as decluttering existing shoes and designating a small corner. For a different room or budget, consider a sleek wall-mounted organizer for a hallway or a stackable solution for a mudroom. We hope these ideas inspire you to create your own beautiful and organized entryway. Explore more ideas to elevate your home!


