Easy DIY Window Box Planter: Budget Decor Ideas
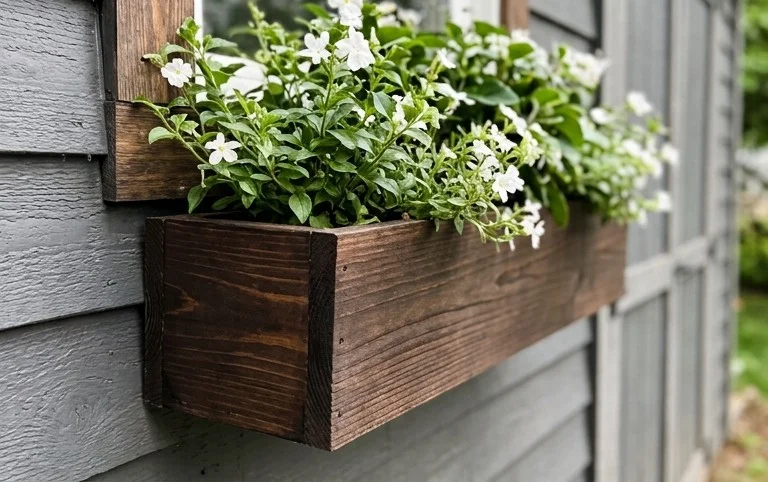
DIY Simple Window Box Planter projects are such a fantastic way to bring life and colour to your home! Are you tired of that bare patch of wall beneath your windows, feeling a little… uninspired? Perhaps you’ve always dreamed of charming, overflowing greenery but thought it was too complicated or expensive. Imagine your windows adorned with a beautiful, rustic planter brimming with vibrant flowers or fragrant herbs. It’s a relatively inexpensive project, usually costing under $50, and can be completed in just a weekend afternoon. In this guide, I’ll walk you through exactly how to build your own gorgeous window box planter, step-by-step. We’ll cover choosing the right materials, simple construction techniques, and even some tips for making it look professionally done!

Breathe Life into Your Windowsills: A DIY Simple Window Box Planter Guide
There’s something undeniably charming about a window box overflowing with vibrant blooms or lush greenery. It’s an instant curb appeal booster, a personal touch that says “welcome” to anyone passing by, and a delightful way to bring a little bit of nature right to your doorstep. And the best part? You don’t need to be a master carpenter or have a huge budget to achieve this charming addition. Today, I’m going to walk you through creating your very own simple window box planter. It’s a weekend project that offers big rewards.
Why a Window Box? The Beauty and the Benefits
Beyond aesthetics, window boxes offer practical benefits. They allow you to garden even if you have limited outdoor space, transforming a blank wall or fence into a living tapestry. They can provide a privacy screen, deter pests (depending on your plant choices!), and even offer a small harvest of herbs or edible flowers. This DIY project is designed to be straightforward, adaptable, and incredibly satisfying.
What You’ll Need and Roughly What It Costs
Let’s talk about the nitty-gritty. For a basic, sturdy window box, you’re looking at a relatively small investment. I’ll give you an example for a box that’s roughly 3 feet long, 6 inches deep, and 6 inches high.
Materials List:
* Untreated Pine or Cedar Wood: You’ll need enough to cut your pieces. I’d recommend a 1×6 inch board (which is actually closer to 0.75 x 5.5 inches). For a 3-foot box, you’ll need approximately 12 feet of this board.
* Rough Cost: $20 – $30
* Wood Screws: Exterior grade, about 1.5 to 2 inches long. You’ll need around 20-25 screws.
* Rough Cost: $5 – $8
* Wood Glue: Exterior grade, for added strength. A small bottle is sufficient.
* Rough Cost: $3 – $5
* Sandpaper: Medium (120 grit) and fine (220 grit).
* Rough Cost: $2 – $4
* Optional: Exterior Wood Sealant or Paint: If you want to protect your wood and add a splash of color.
* Rough Cost: $10 – $20
Tools You Might Need:
* Measuring Tape
* Pencil
* Saw (Hand saw, miter saw, or circular saw)
* Drill with Drill Bits (one for pilot holes, one for driving screws)
* Clamps (helpful, but not strictly necessary if you’re careful)
* Safety Glasses
Estimated Total Cost:
For a single, simple 3-foot window box, you’re looking at a budget of roughly $40 to $70, depending on the wood choice and whether you already have some of the tools. This is a fantastic value for a custom piece!
Measuring and Planning: The Foundation of Success
Before you even think about cutting wood, let’s get our measurements right. This is where you prevent frustration and ensure your window box fits perfectly.
Step 1: Measure Your Window Space
* Measure the width of the area where your window box will sit. Be precise! I recommend measuring at least three points: the very top, the middle, and the bottom.
* Consider the depth. How far out do you want the box to extend? 6 inches is a common and manageable depth.
* Think about the height. A 6-inch height is good for most plants and doesn’t feel too bulky.
Step 2: Plan Your Cuts
For a 3-foot (36-inch) long, 6-inch deep, and 6-inch high box, here’s a typical breakdown:
* **Front and Back:** Two pieces, each 36 inches long (from your 1×6 board).
* **Sides:** Two pieces, each 5.5 inches long (this accounts for the width of your front and back boards when joined – the actual depth of the 1×6 board).
* **Bottom:** One piece, 36 inches long and the width of your board (5.5 inches). You’ll likely need to join two narrower boards to make this, or use a slightly wider board if available. For simplicity, if you can find a 1×8 board, you could cut a 36-inch length from that and then rip it down to 5.5 inches. Alternatively, you can create a slatted bottom using several narrower pieces, which aids drainage. For this guide, I’m assuming a solid bottom for simplicity, but drainage holes are crucial!
Step 3: Drainage Considerations**
This is paramount. Waterlogged roots are the quickest way to kill your plants. If you’re building a solid bottom box, you *must* drill drainage holes. Aim for at least six to eight 1/2-inch holes, spaced evenly across the bottom panel. If you opt for a slatted bottom, the gaps between the slats will provide natural drainage.
A Clear Walkthrough: Building Your Window Box
Now, let’s get building! Don’t be intimidated; we’re taking it step-by-step.
- **Cut Your Wood:** Using your measurements, carefully cut all the pieces to size. If you’re using a hand saw, take your time for straight cuts. If you have a miter saw, this will be much faster and easier. Remember to wear your safety glasses!
- **Sand the Edges:** Once all your pieces are cut, give them a light sanding with medium-grit sandpaper. This removes any splinters and makes the wood smoother to handle.
- **Assemble the Sides:** Take one of your side pieces (5.5 inches long). Apply a bead of wood glue along one of its long edges. Align it flush with the end of your front piece (36 inches long), creating an ‘L’ shape.
- **Pre-Drill Pilot Holes:** Before screwing, drill pilot holes. This prevents the wood from splitting. Drill two pilot holes through the front piece and into the edge of the side piece, about 1 inch from each end.
- **Screw it Together:** Drive your wood screws through the pilot holes to secure the side piece to the front piece.
- **Repeat for the Other Side:** Attach the other side piece to the other end of the front piece in the same way. You should now have a U-shape.
- **Attach the Back:** Apply glue to the exposed edges of the side pieces. Align the back piece (36 inches long) to close the box. Pre-drill pilot holes through the back piece into the edges of the side pieces, and then screw them together. You now have an open-ended box.
- **Add the Bottom:** Apply glue to the bottom edges of your assembled box. Carefully place the bottom piece (36 inches long by 5.5 inches wide) onto these edges. Pre-drill pilot holes through the bottom piece into the front, back, and side pieces. Secure with screws. If you’re using a slatted bottom, space your slats evenly and screw them into the front and back pieces.
- **Drill Drainage Holes (if using a solid bottom):** Flip your box over and drill your drainage holes as planned in step 3 of the planning section.
- **Final Sanding:** Give the entire box a final light sanding with fine-grit sandpaper. This smooths out any rough spots and prepares the wood for finishing.
- **Seal or Paint (Optional):** If you want to protect your window box from the elements and add some flair, now is the time to apply your exterior sealant or paint. Follow the product instructions for application and drying times.
Adapting for Small Spaces or Rentals
Don’t have a yard or can’t drill into your home’s exterior? No problem!
Hanging Brackets: The Rental-Friendly Solution
Many window boxes are designed to be mounted directly to a wall or windowsill. However, for rentals or if you’re hesitant about drilling, you can use specialized window box hanging brackets. These brackets typically hook over the windowsill and support the weight of the box from the outside, requiring no drilling into the building itself. Always check the weight capacity of the brackets and ensure they fit your windowsill securely.
Indoor Window Boxes
If your “window box” is purely for indoors, you can simplify significantly. You might even use a pre-made planter box. The key is ensuring it has good drainage (use a pot liner with drainage holes and a drip tray, or choose a planter with a built-in drainage system). You can also adapt the same wood-building principles but use smaller dimensions and lighter wood.
Styling Notes: Making Your Window Box Shine
Once your box is built, the fun really begins: filling it with life!
Color and Texture Harmony
Think about the color of your house, your doors, and your windows. Do you want your window box to blend in or pop?
* **Earthy Tones:** Natural wood, terracotta pots, and plants with green and brown hues create a rustic, organic feel.
* **Vibrant Pops:** A brightly painted box (think teal, a cheerful yellow, or a classic red) will draw attention. Pair with flowers in contrasting or complementary colors.
* **Monochromatic Magic:** Using plants with varying shades of green, or flowers in a single color family, can create a sophisticated and calming look.
Plant Placement: The Art of Arrangement
Once your box is filled with soil (use a good quality potting mix!), it’s time to plant.
* **The Thriller, Filler, Spiller Method:** This is a classic for a reason.
* **Thriller:** A taller, eye-catching plant in the center or back of the box that provides height and drama. Examples: Ornamental grass, a taller flowering perennial.
* **Filler:** Mounding plants that fill in the space around the thriller and add bulk. Examples: Petunias, marigolds, impatiens.
* **Spiller:** Plants that trail over the edge of the box, softening the edges and adding movement. Examples: Trailing petunias, ivy, creeping thyme.
* **Consider Sunlight:** Be honest about how much sun your window box location gets. Choose plants that thrive in those conditions. Partial shade lovers like fuchsias and impatiens will struggle in full sun, and sun-worshippers like succulents will wilt in deep shade.
* **Herb Gardens:** For a functional and beautiful window box, consider a mix of herbs. Plant basil, parsley, chives, and thyme together. A few edible flowers like nasturtiums can add color and a peppery bite.
Keeping It Tidy After Week One
The initial planting looks amazing, but how do you keep it that way?
* **Watering Wisely:** Check the soil moisture regularly. Stick your finger about an inch into the soil. If it feels dry, it’s time to water. Window boxes can dry out quickly, especially on sunny and windy days. Water thoroughly until you see water draining from the bottom.
* **Deadheading:** This is crucial! As flowers fade, pinch or snip them off. This encourages the plant to produce more blooms instead of putting energy into seed production. It also keeps the box looking neat.
* **Pruning and Trimming:** For trailing plants, trim them back if they get too leggy or start to overtake other plants. For any plants that look leggy or sparse, a light trim can encourage bushier growth.
* **Weeding:** Even in a container, weeds can appear. Pull them out as soon as you spot them.
* **Fertilizing:** Depending on your plants and soil, you may need to fertilize every 4-6 weeks during the growing season with a diluted liquid fertilizer.
The Mistakes That Make This Fail
Even with the best intentions, some things can go wrong. Here are the common pitfalls to avoid:
* **Poor Drainage:** I can’t stress this enough. If your window box doesn’t drain well, your plants *will* die. This is the number one reason for window box failure.
* **Incorrect Plant Choices:** Planting shade-loving plants in full sun, or vice versa, is a recipe for disappointment. Research your plants’ needs before buying.
* **Overcrowding:** Cramming too many plants into the box leaves them competing for resources and can lead to poor air circulation and disease. Give them room to grow.
* **Neglecting Maintenance:** A “set it and forget it” approach rarely works for living things. Regular watering, deadheading, and occasional trimming are essential.
* **Using Untreated Wood in Very Wet Climates:** While this guide suggests untreated wood for simplicity, if you live in an extremely wet climate and don’t plan to seal or paint, your window box might not last as long. Cedar is naturally more rot-resistant than pine.
* **Ignoring Weight:** Especially if you’re using hanging brackets, be mindful of how heavy your window box will be when wet and filled with soil. Overloading can be dangerous.
Building your own window box is a rewarding and accessible project. With a little planning and some basic DIY skills, you can transform a plain window into a beautiful focal point. Happy gardening!
Conclusion
Adding a simple window box planter can truly transform the everyday feel of your home. Imagine that pop of green greeting you each morning, or a splash of color brightening your kitchen counter. It’s a small change that brings significant joy. To get started today, simply gather a few small pots and some fresh soil. You can enjoy a mini version of this DIY simple window box planter right now!
Variations to Inspire
For a different space, consider a hanging herb garden in your kitchen for fresh flavors, or a small succulents arrangement on your desk for a budget-friendly touch of nature. We hope this inspires you to bring more green into your life. Explore more of our home decor and organization ideas to continue creating your dream space!
